
Alex's Journey to the Grave
Unique Lighting for a Sprite in Ren'Py - July 2025 Devlog
Hello everyone, Duhop here.
I thought I would talk about something a bit more technical this month, because I’m really proud of a scene we finished, and I think going into detail on it might help out some fellow Ren’Py devs.
Our background artist JustEmmi, our character artist Paintedtrash, and myself all worked together to let it come to life in-game, and some clever use of Ren’Py’s layered images, masking, and blending modes let us do it without absolutely exploding the filesize.
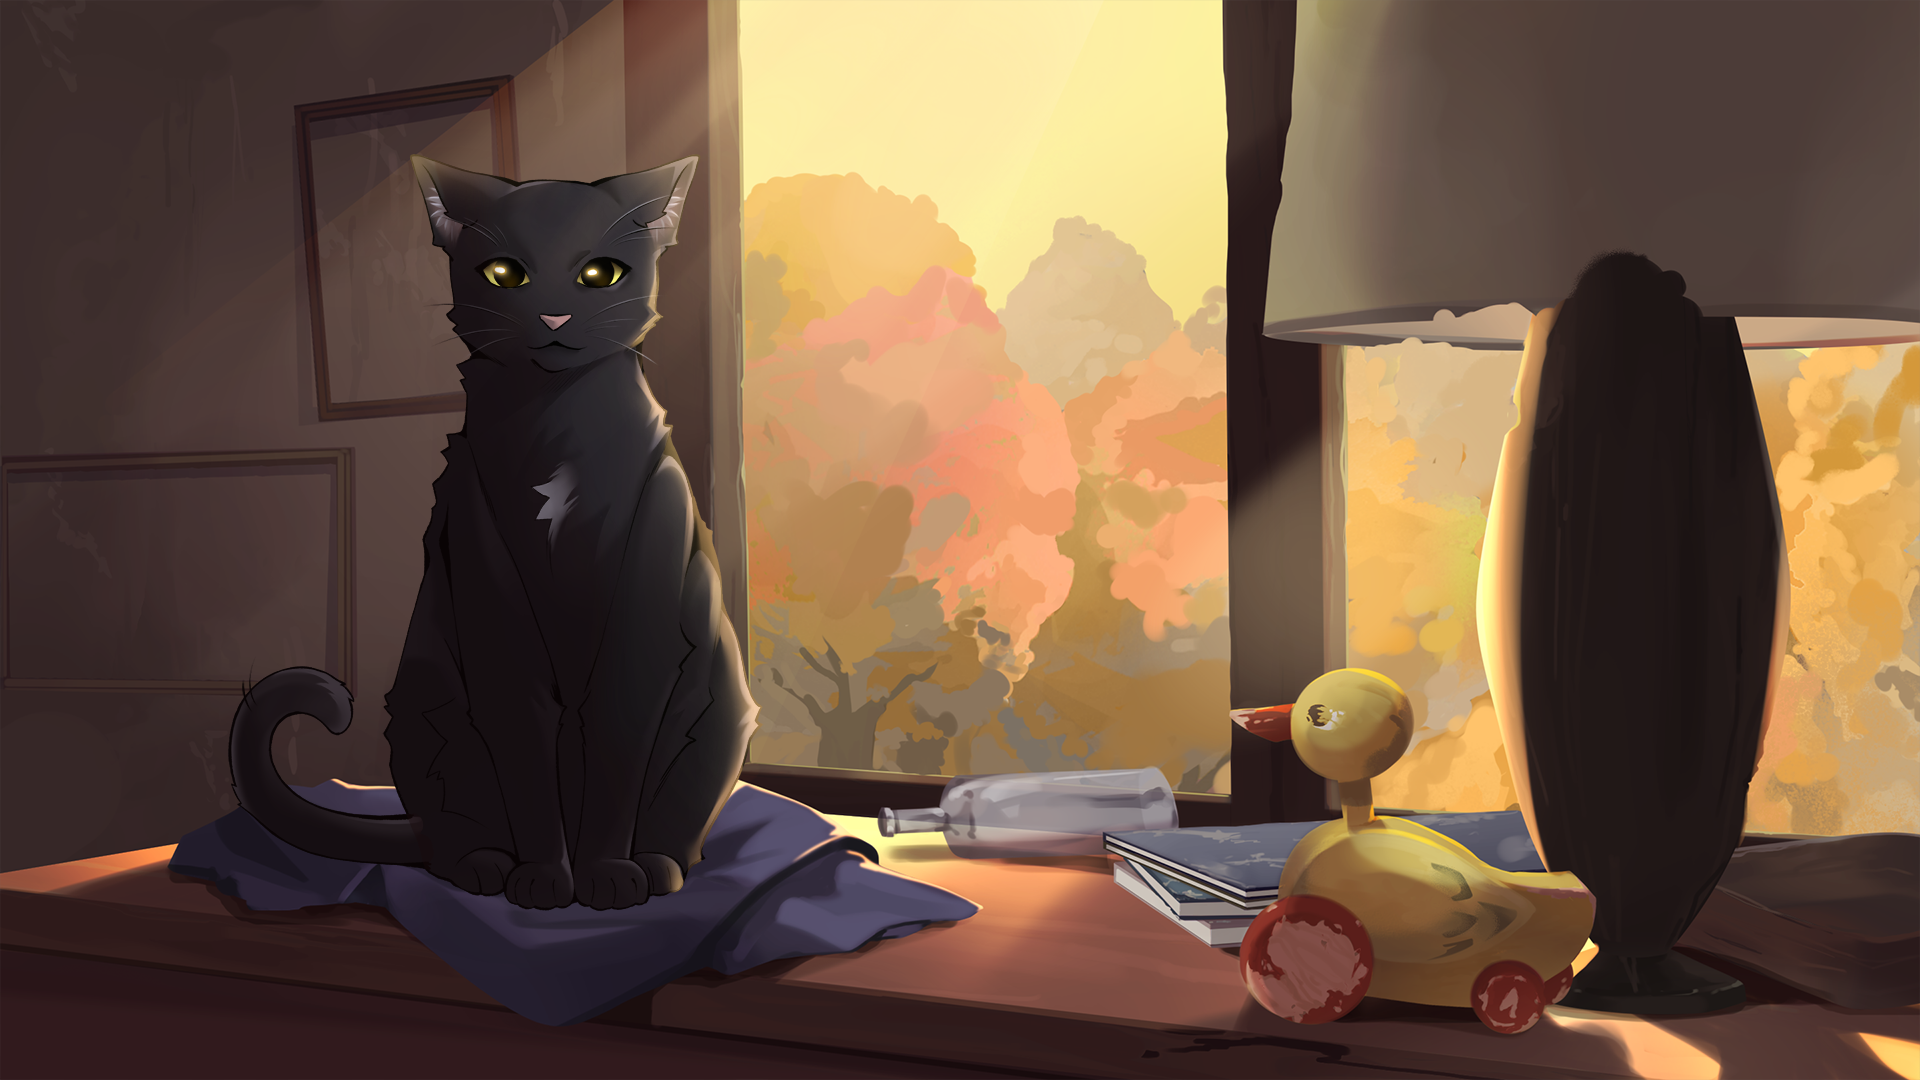
So here’s the scene in question:
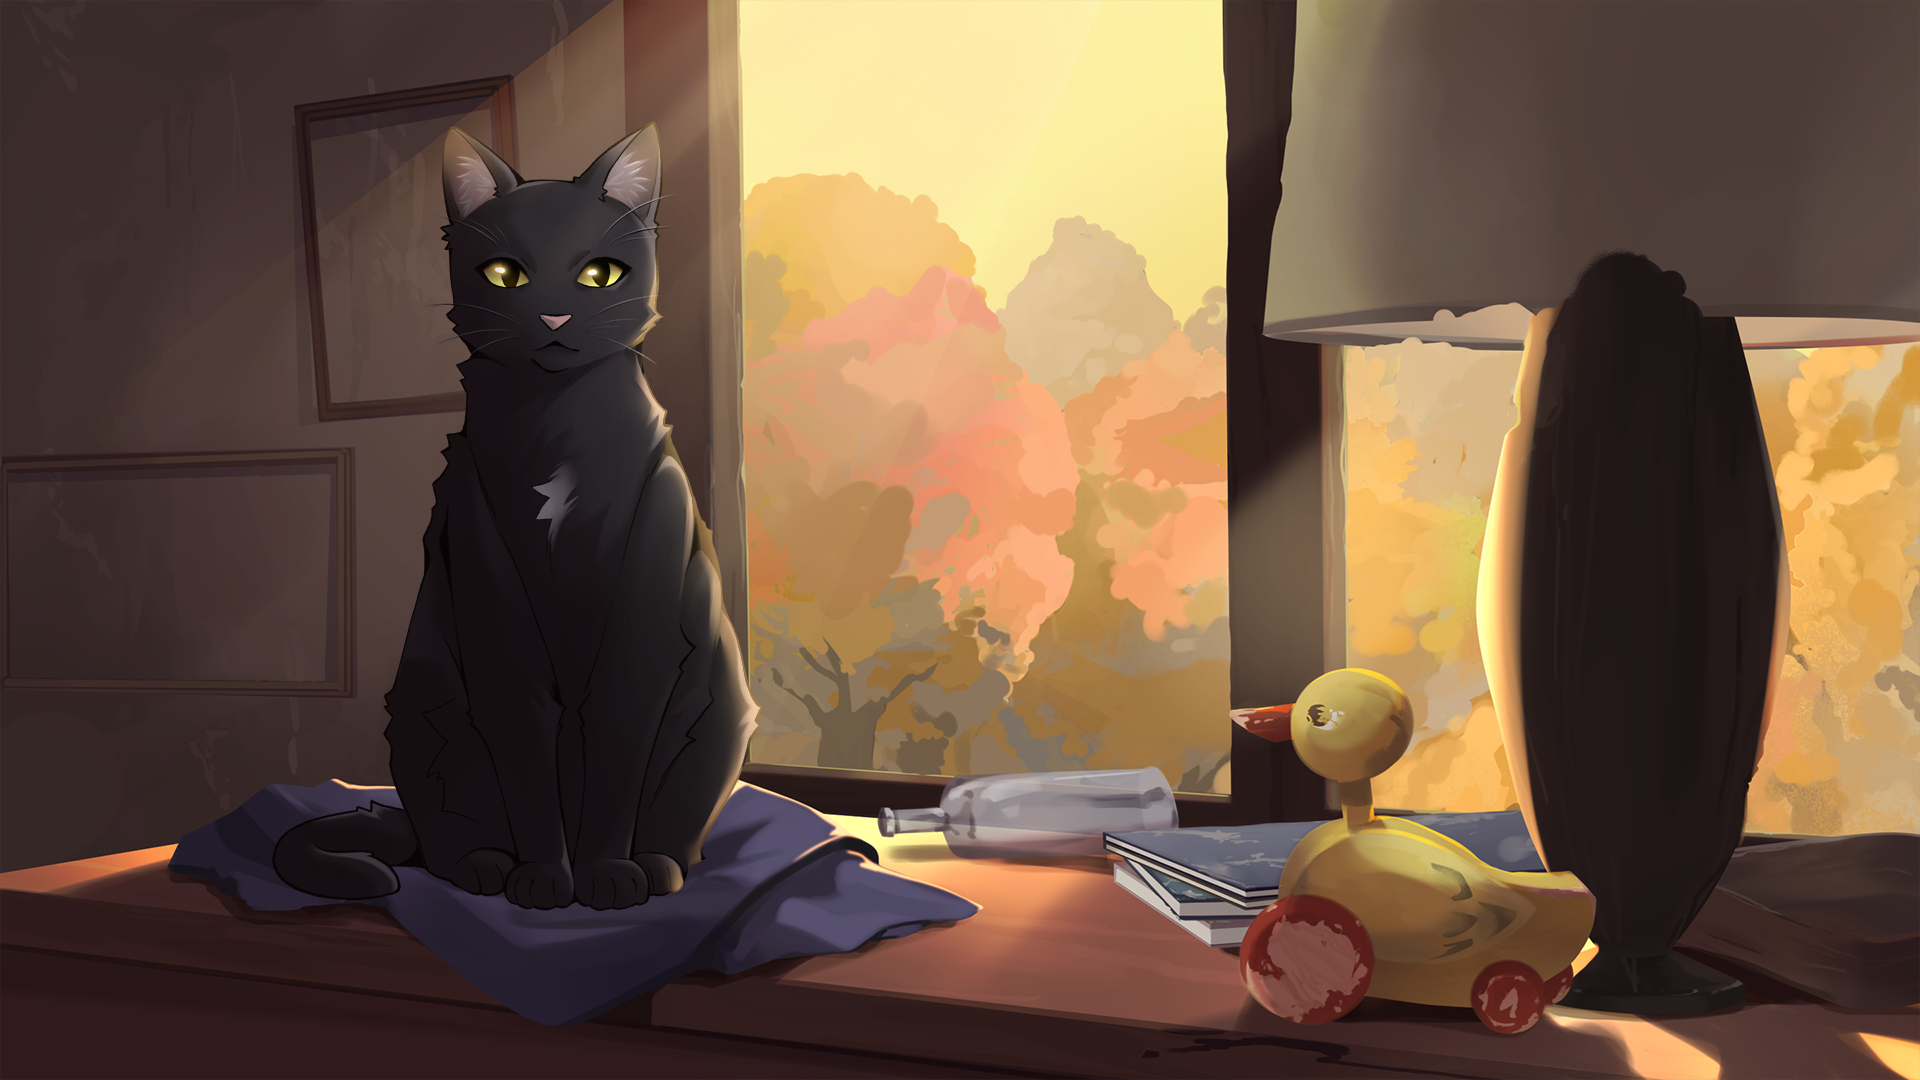
Would you believe me if I told you the cat in this scene was actually a sprite with multiple expressions and poses, and not just part of the background image? Maybe you would at first glance, but take a closer look. Notice how the godrays continue to shine over her. Notice how her fur glows in the sunlight, and darkens in its shadow.
You might just think the lighting is part of her sprite, but adding scene-specific lighting to every single layer of a multi-use sprite with numerous alternate poses and expressions? That would be needlessly time-consuming and tedious work, not to mention the vast and unnecessary extra filesize if you intend to use the same sprite again with different lighting.
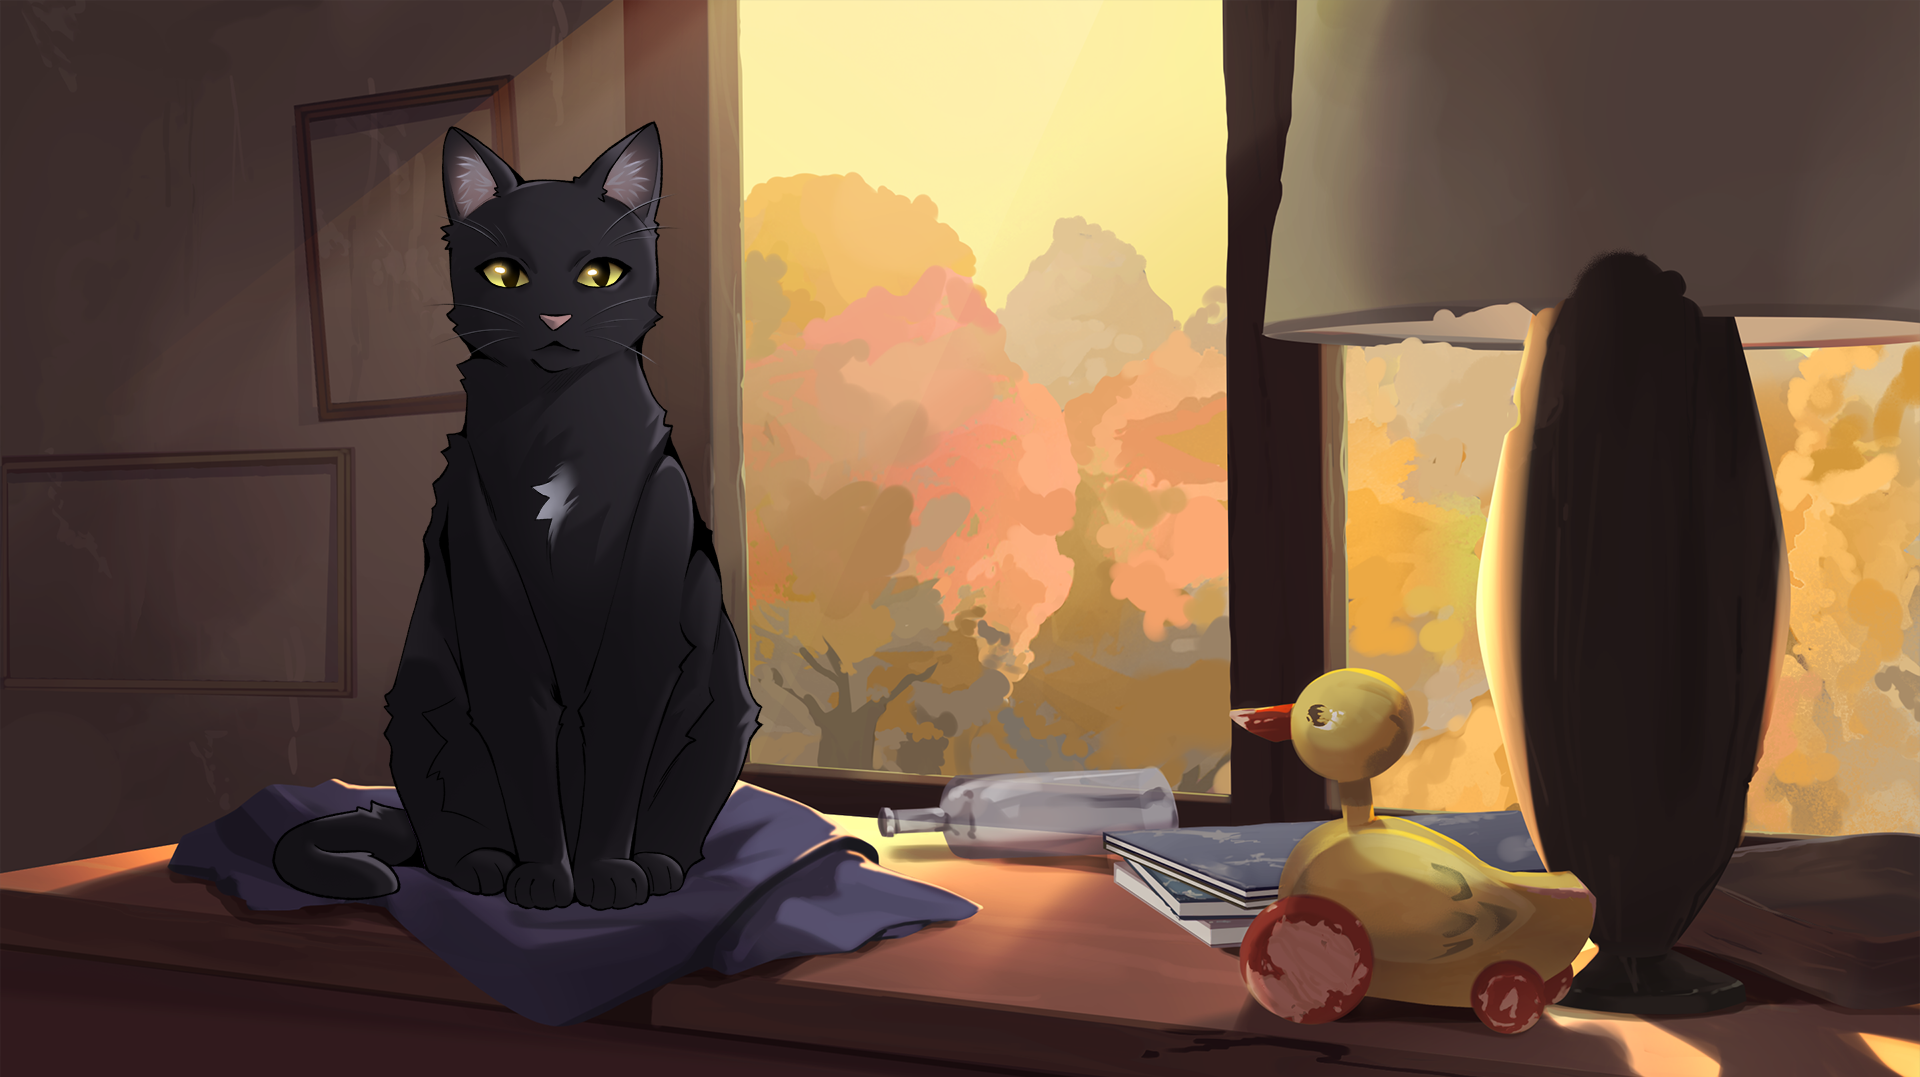
So here’s what the scene looks like with just the cat’s base sprite, without any of the added lighting:
Now, what do we need to add to match her lighting to the background’s? I mentioned them once already, but there are three distinct lighting elements we added here; the light shining on her side, the shadow cast over her front, and the godrays in the air in front of her.
Let’s just start with the simplest of the three, the godrays that shine in front of her. All they are is a part of the background, so all we need to do is split the background into two images; the godrays, and the rest of it.
Then we simply show the godrays as a separate displayable, and make sure it’s displayed above the sprite. Here’s what we end up with:
Okay, that was easy (at least, assuming you had the godrays on a separate layer to begin with). But what about the lighting on the cat herself?
Our character artist has prepared two layers that can be added to the layeredimage for her sprite. One for the light, and one for the shadow. Here’s what they look like on their own:


These layers need to be masked to the the base pose of the sprite, but since the sprite has multiple poses, we would have to add slightly different versions of these layers for each pose individually if we masked them externally. Thankfully, Ren’Py has an easy way to do that in-engine, so we only need the one version of each lighting layer.
Here’s a simplified version of how the layeredimage looked before adding the lighting layers:
layeredimage cat:
    image_format "sprites/cat/{image}.png"

    group pose:
        attribute pose1 default:
            "catpose1"
        attribute pose2:
            "catpose2"

    group tail:
        attribute tail_neutral default:
            "cattailneutral"
        attribute tail_flick:
            "cattailflick"

    group eyes:
        attribute eyes_neutral default:
            "cateyesneutral"
        attribute eyes_open:
            "cateyesopen"
        attribute eyes_squint:
            "cateyessquint"

    group mouth:
        attribute mouth_neutral default:
            "catmouthneutral"
        attribute mouth_open:
            "catmouthopen"
You might want to keep this initial layeredimage separate, and define a new one for the scene you need the specific lighting for. It’s just code, no extra images, and you’ll see in a moment why this could make things easier.
Now we have to add the lighting layers in a way that will have them masked to whichever pose attribute is currently being shown. It would be annoying to have to switch to the proper overlay attribute every single time you changed the pose, so the simplest way is to add them to the pose attributes themselves, right? But that won’t work, because they also need to be displayed overtop of every other attribute, and the poses are displayed at the bottom. (You can tell because they are listed at the top! XD)
Except actually, it can work. All you need to do is add the masked overlays to those very same pose attributes at the bottom of the layeredimage definition. Because you can have displayables within the same attributes for the same groups, but on different layers of the layeredimage, simply by adding them again to the definition in a different part of the layer order. However, that means they will always be displayed together with each pose, which is why you might want to keep around that initial layeredimage without them.
Confused yet? This is something that isn’t always obvious when learning how to use a layeredimage, but makes a lot of sense in practice.
Here’s the finished layeredimage definition, with both lighting layers added:
layeredimage cat_glow:
    image_format "sprites/cat/{image}.png"

    group pose:
        attribute pose1 default:
            "catpose1"
        attribute pose2:
            "catpose2"

    group tail:
        attribute tail_neutral default:
            "cattailneutral"
        attribute tail_flick:
            "cattailflick"

    group eyes:
        attribute eyes_neutral default:
            "cateyesneutral"
        attribute eyes_open:
            "cateyesopen"
        attribute eyes_squint:
            "cateyessquint"

    group mouth:
        attribute mouth_neutral default:
            "catmouthneutral"
        attribute mouth_open:
            "catmouthopen"

    group pose:
        attribute pose1 default:
            AlphaMask("catoverlayshadow", mask="catpose1")
        attribute pose2:
            AlphaMask("catoverlayshadow", mask="catpose2")

    group tail:
        attribute tail_neutral default:
            AlphaMask("catoverlayshadow", mask="cattailneutral")
        attribute tail_flick:
            AlphaMask("catoverlayshadow", mask="cattailflick")

    group pose:
        attribute pose1 default:
            blend "add"
            AlphaMask("catoverlaylight", mask="catpose1")
        attribute pose2:
            blend "add"
            AlphaMask("catoverlaylight", mask="catpose2")
Okay, woah. You’ve probably noticed there’s a lot going on here that I haven’t explained yet.
First, I’m using AlphaMask to create displayables that are masked by another displayable. For the pose1 attribute, I’m using the image already used for the pose1 attribute on the bottom layer at the top of the layeredimage, and so on for pose2 and the tails. So now, the shadow and light layers will always be displayed overtop of everything, masked to the correct current pose.
Wait, what? The tails?
Yeah. The tails are a separate part of the cat’s body listed in a different group than the rest of the base pose, so in addition to adding the lighting layers with masks for the pose attributes, we must add them with masks for the tail attributes as well. But because there is no part of the light overlay near her tail, in reality I only needed to do that for the shadow overlay.
And finally, the shadow and light overlays are added separately, with a different blend mode for the light overlay. The light overlay needs to be above the shadow overlay, and it needs the “add” blend mode to allow it to properly brighten the image below.
Here’s what it looks like after adding the shadow layer:
And after adding the light layer:
And with a different pose, we can see how the alternate masks continue to keep the lighting layers in check:
And that’s pretty much it. Hopefully you’ve found this interesting, and if you’re a developer yourself, maybe even helpful!
Thank you so much for reading and showing your support for the Alex’s Journey to the Grave!
-Duhop
Leave a comment
Log in with itch.io to leave a comment.